

ESPixelStick V1 – An E1.31 WiFi Pixel Controller
What is it?
A cost effective solution for driving a universe of pixels via E1.31 over WiFi. The controller itself fits in 1″ thin wall PVC to enable embedding with the fixture its controlling.

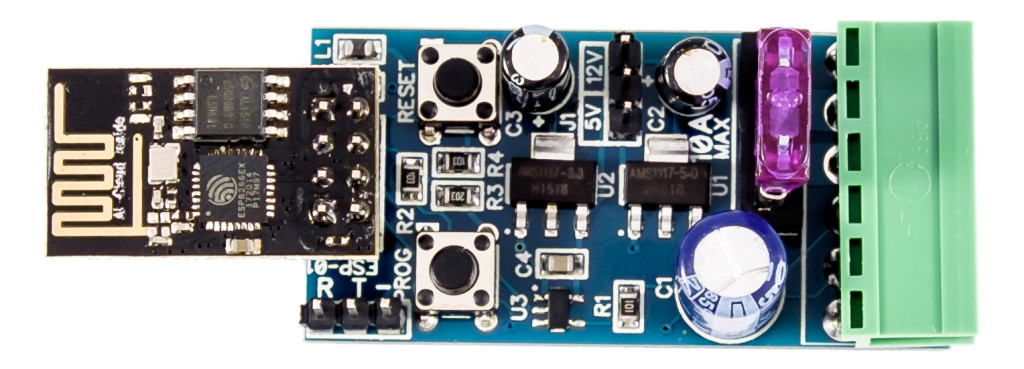
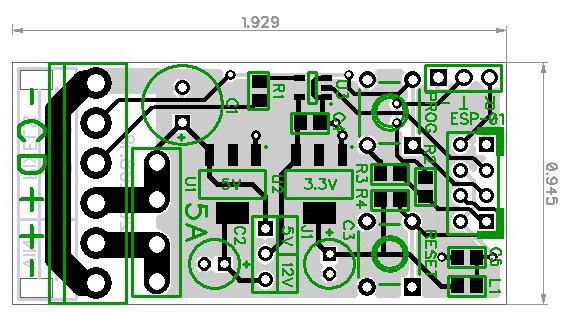
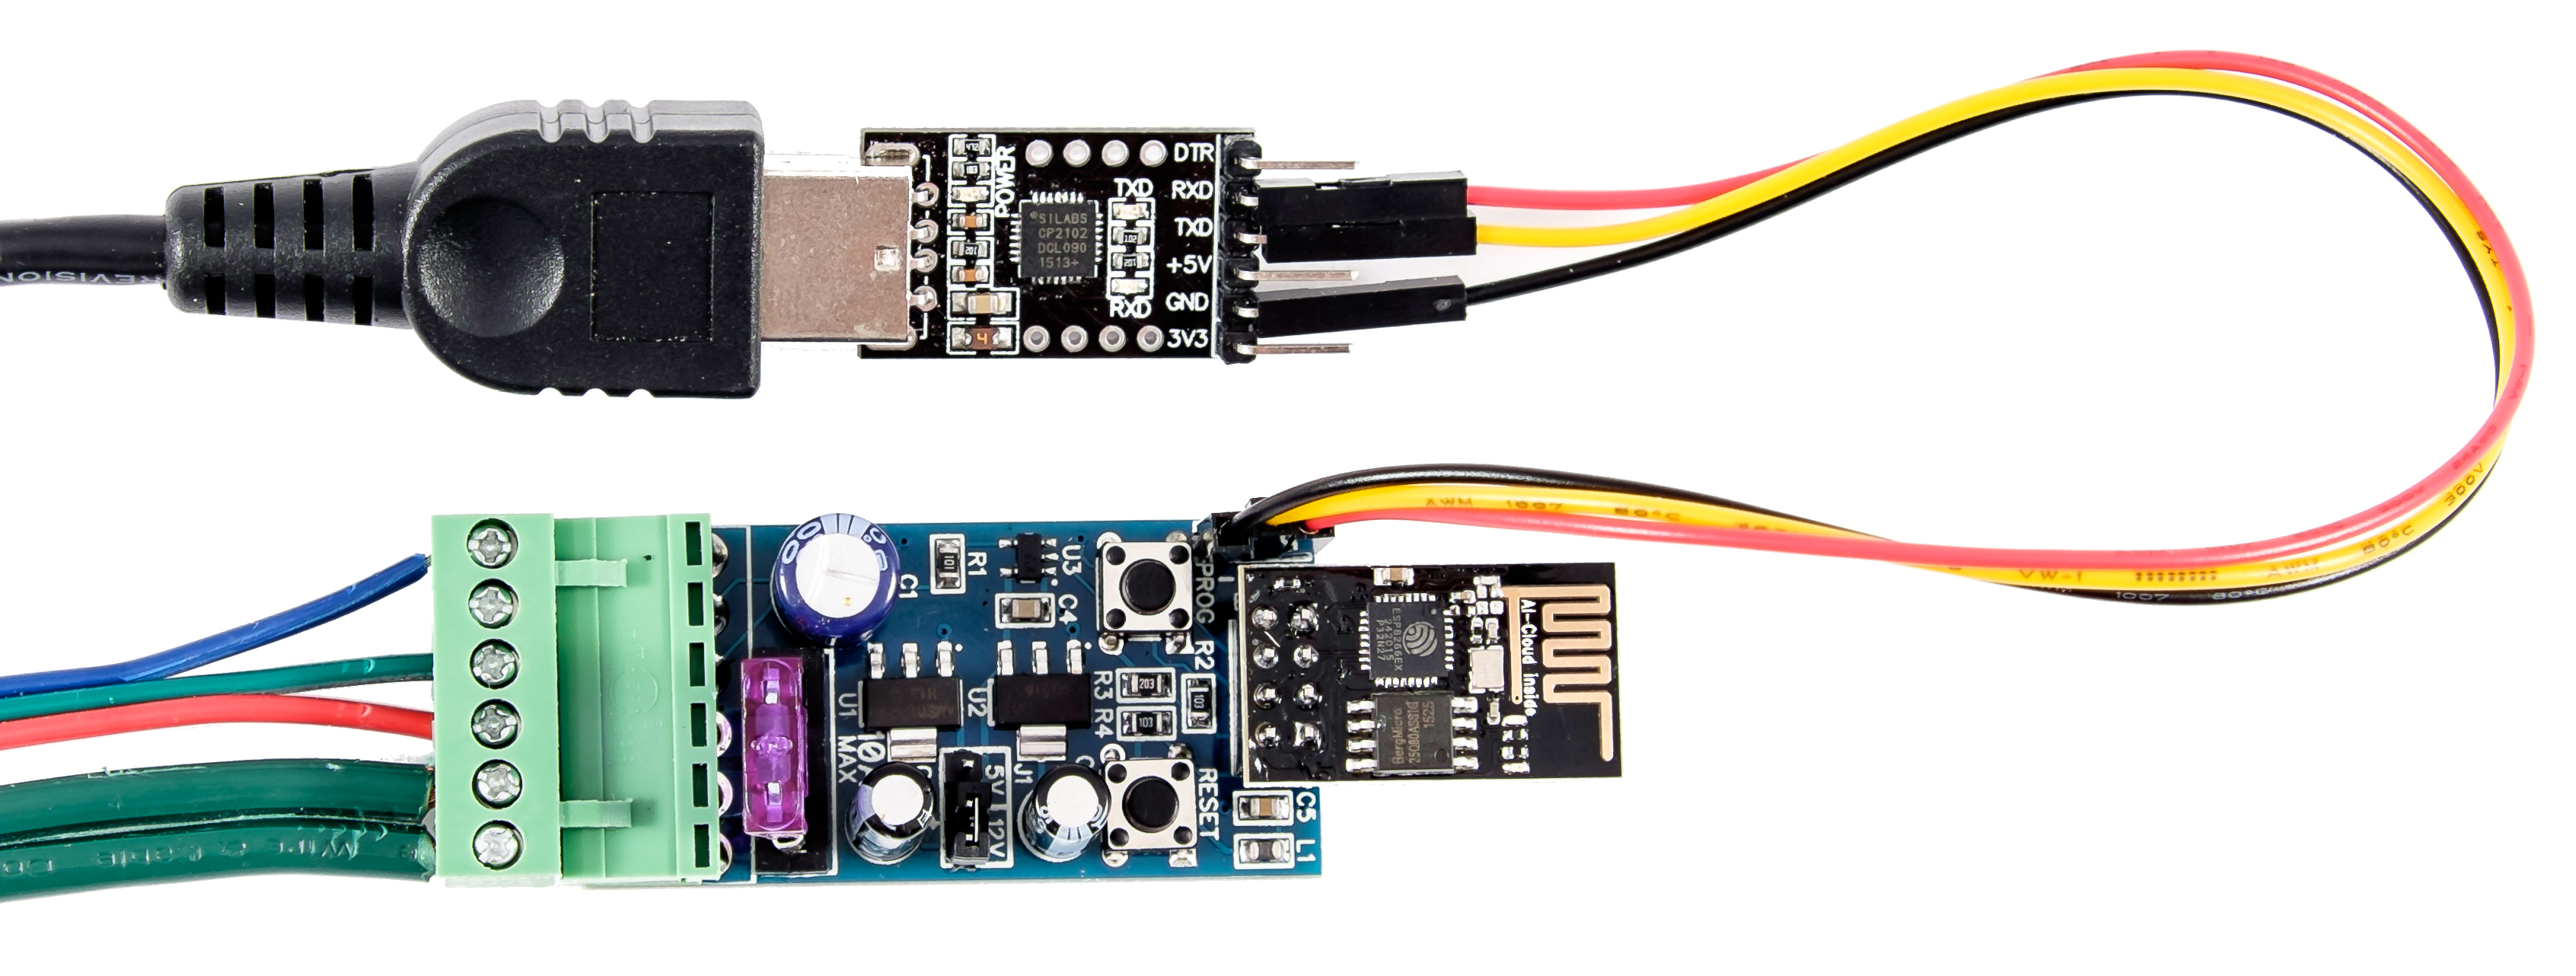
From a hardware perspective, the ESPixelStick is a pixel driver motherboard for the ESP8266 ESP-01 WiFi module. It provides proper power regulation for the module, a 5V tolerant programming interface, 5V buffer drive for the data line, configurable 5V/12V pixel support, fusing, and power connectors suitable for 5A of current.
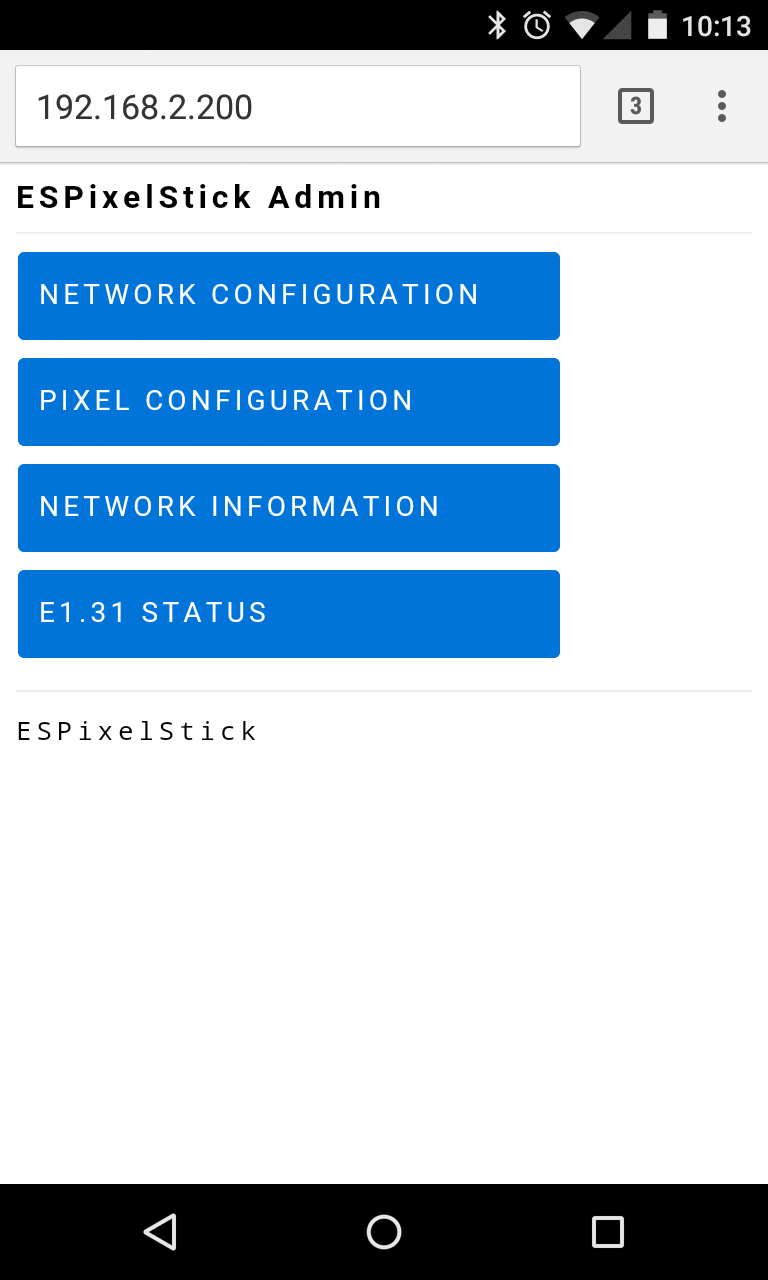
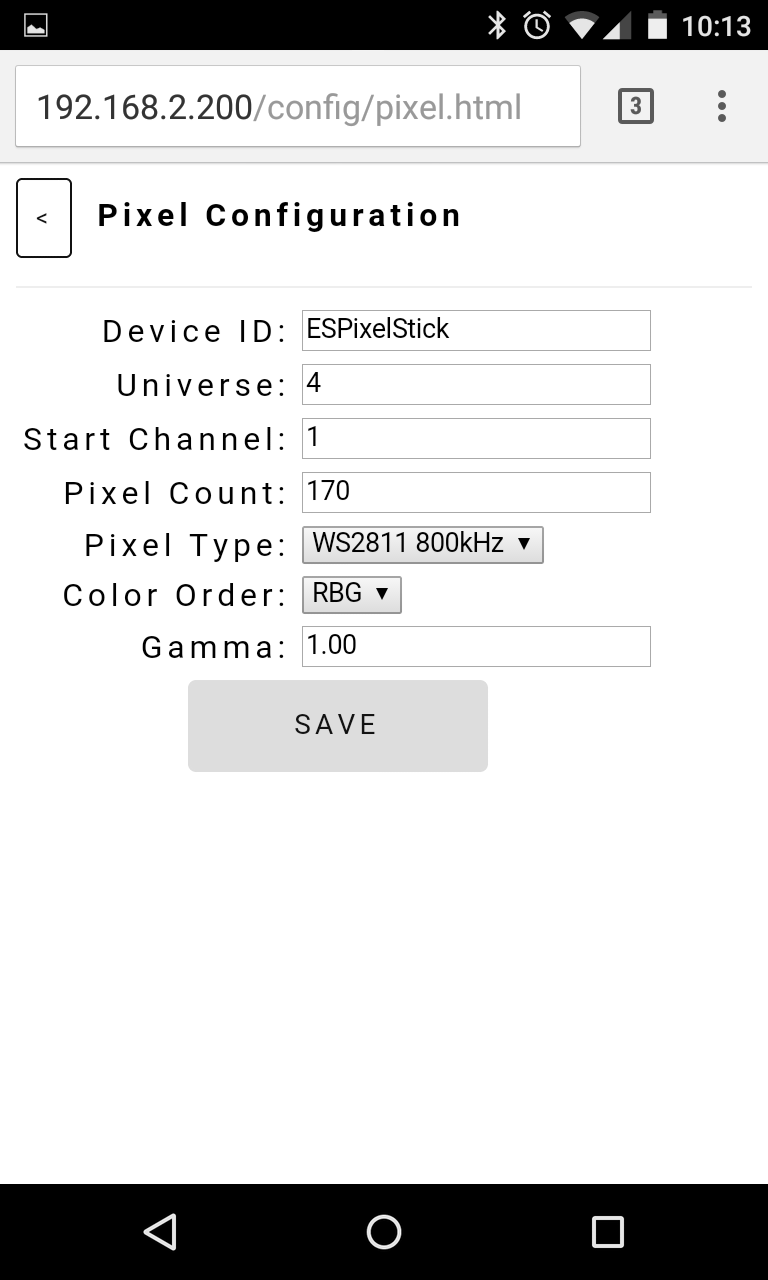
From a software perspective, it is an E1.31 sACN (Streaming ACN) pixel controller that connects over a standard (802.11g/n) WiFi network. The firmware is open source and developed in the ESP8266 Arduino environment. It provides a web based configuration front-end and currently supports WS2811 / WS2812 pixels. The web based configuration is mobile friendly and makes configuration a breeze, thank to John Lassen’s web framework.
How do I use it?
Wiring
Pixel and power wiring is straight forward and simple. Just make sure to set the jumper to 5V or 12V based upon your power source. The programming interface consists of 3 wires: Ground, Serial Transmit, and Serial Receive. Using a USB to serial breakout, simply connect the grounds together, T to TX on your adapter, and R to RX on your adapter. Any USB to serial adapter that exposes the Ground, TX and RX connections should work, provided your system has the drivers for it. CP2102 and FTDI (legit) based adapters shouldn’t require drivers to be loaded if you’re on Windows.
Flashing and Configuration
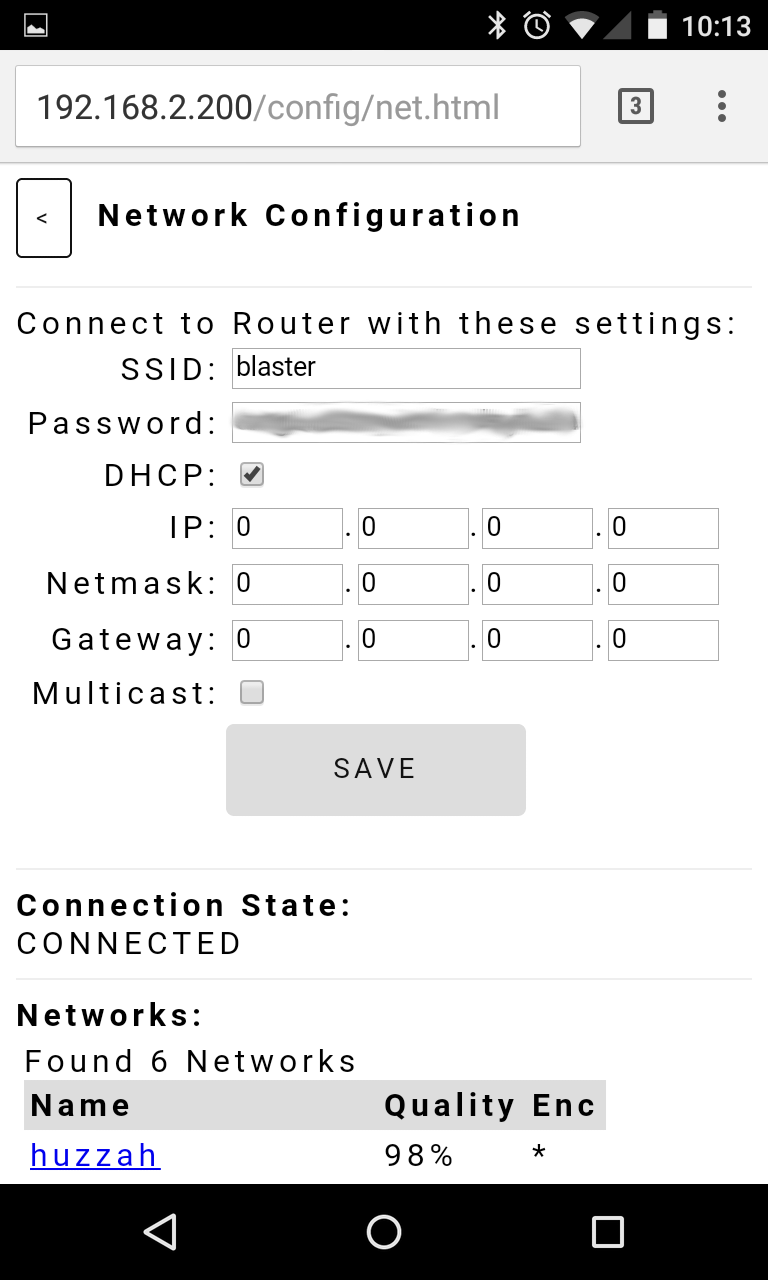
Flashing is done via the Arduino IDE with the ESP8266 board add-on. You’ll need to have the board powered as no power connections are made via the programming connection. To enter flash mode, reset the ESPixelStick using the RESET button, while holding down the PROG button – <Press PROG><Press / Release RESET><Release PROG>. At the top of the ESPixelStick sketch, you can define your default ssid and passphrase for your WiFi access point. The ESPixelStick will report its status and IP via the Arduino Serial Monitor as it connects to your network. Further configuration can be done via the web interface once the ESPixelStick is connected to your network.
Making it flash lights!
If you’re new to lighting control or DMX, I recommend doing a little reading on E1.31 – sACN (Streaming ACN) which is the “DMX over Ethernet” standard. diychristmas.org and doityourselfchristmas.com are excellent resources to get you started in lighting control. Vixen 3 and xLights are two free and open source applications I recommend looking at to get you started in sequencing. Both are actively being developed and offer different angles on light sequencing.
Here are 4 modules being tested (one attached to each pixel column), driven by Vixen 3
Where can I get it?
The ESPixelStick is available for purchase on Amazon.
Latest Firmware: https://github.com/forkineye/ESPixelStick/releases
Latest V2 Manual: ESPixelStick Assembly and Usage
290 thoughts on “ESPixelStick V1”
quote me for 100 please.
I’ll contact you this week.
Nice board! What transistor are you using on the data line?
Thanks! I’m using a 3.3v-5v non-inverting buffer – OnSemi M74VHC1GT125DT1G.
Hi thank you for your hard work on the espixelstick but I hoping you could help me with a small issue.
the unit is working in multicast with a problem with resetting every minute (virtual to the second) and im not sure why?
com port reports
ESPixelStick v1.3
– Configuration loaded.
Connecting to TP-LINK_B123CA………..
Connected DHCP with IP: 192.168.0.100
– Universe: 4
– Multicast address: 239.255.0.4
– Web Server started on port 80
– Listening for 510 channels, from Universe 4 to 4
Exception (0):
epc1=0x40107092 epc2=0x00000000 epc3=0x00000000 excvaddr=0x00000000 depc=0x00000000
ctx: sys
sp: 3ffffda0 end: 3fffffb0 offset: 01a0
>>>stack>>>
3fffff40: 4020d845 3fff5fb0 3fffff80 3fff5af0
3fffff50: 3ffe0000 3fff5f88 3ffec900 4020e200
3fffff60: 3fff5fb0 3fff5af0 3ffede36 40213fe3
3fffff70: 3fff5af0 00000014 40214582 3fff5fb0
3fffff80: 3fff5af0 3fffdc80 3fff5b88 00000052
3fffff90: 40214eaf 3fff5fb0 00000000 3fffdcc0
3fffffa0: 40000f49 3fffdab0 3fffdab0 40000f49
<<<stack<<<
ets Jan 8 2013,rst cause:2, boot mode:(1,6)
ets Jan 8 2013,rst cause:4, boot mode:(1,6)
wdt reset
any ideas?
Do you have any other devices on your network? It sounds like your multicast traffic is being queued on the DTIM interval which is common when devices with power management are connected (like phones, laptops, tablets, etc…). With 3rd party firmware, you can force Multicast rates, but a dedicated network is recommended if you require Multicast. Can you use Unicast?
The network router is only connected to the Nodemcu 1.0 Esp12-12E and my laptop which is streaming the artnet but even if the module is the only thing connected to the router it still reset’s after 1 minute (54 sec from logging onto the network).
I’ve adjusted the settings inside the router but this made no difference and also tried a Netgear router with the same result .
I’m currently using a TP-Link TL-WR841HP.
You also said about unicast I’m not sure how to set it up in this mode?
any help would be appreciated
The part where the esp places your wifi credentiels gets corrupt!!
This would not compile for the NodeMCU board for me in the Arduino IDE.
A sorta newbie but not, am I missing something?
Follow the directions in the github repo and report issues there if you have them. Thanks!
I know whats wrong,its the cheap flash chips inside the esp under the metal case,replace it with winbond chip,100% fix,esp sometimes come with cheap chinese clones of the flash,they become corrupt quite quick,about 20 erase and writes and they are for the bin.
Hi, are the board’s available for purchase yet? If not are the files available so I can get my own boards made up?
I have 100 more coming in the first of next month and will be making them available here – http://diychristmas.org/vb1/showthread.php?4684-ESPixelStick-Group-Buy-E1-31-WiFi-Pixel-Controller-kit. I be placing a larger order after the first of the year, just not enough time left this year to work on it. Thanks!
when will more be available? i want at least 20.
I’m doing some updates to the design and plan on having more available come spring time, thanks!
what if i wanted a few for testing purposes, where could i have the board made etched? are the smd parts solderable by hand?
This is the current version on OSHPark – https://oshpark.com/shared_projects/csfAroXY and the BOM from Mouser – http://www.mouser.com/ProjectManager/ProjectDetail.aspx?AccessID=9ee5bfce42 if you want to build one yourself. It’s 0805 passives. The new one will be 0603 passives and a QFN with a powerpad, so you’ll need an oven or such.
id prefer not to have to do the smd parts. so you don’t have any boards available?
I currently don’t have anymore left. The updated boards should be available around spring time.
Hi,
Excellent work! Any chance you are looking at releasing the schematic for the board?
Thanks!
Dave
I’ll be updating the GitHub repo this week and will add it along with some documentation.
Did you get the schematic posted? Don’t see an update to the repository since the 1.3 version. Did I miss something?
There’s a copy of the schematic here – https://flic.kr/p/BFC8Vi. I’ll add it to the repository once I update it.
Any thought about adding zig-zag support?
It’s on my list for a future enhancement, but won’t make it in this year.
Raw boards hosted here by sporadic
https://oshpark.com/shared_projects/csfAroXY
You will have to build them yourself but the BOM and in the above linked manual
What would be cool would be design the .brd where the electrolytic capacitors allow you to put the ESP-01 over the board reducing the footprint even further
Excellent project and build guys!
Thanks! The reason for the orientation is to get the antenna of the ESP-01 in free space. Really don’t want to have it over the board as it will adversely effect the performance. I’m planning to have more kits available in the spring time, and possibly a board revision as well.
im very interested in buying some kits. are any available anytime soon?
I’m currently updating the design and expect to have more boards available come spring time. Thanks!
Hi.
I’ve ordered a few boards from oshpark to build your espixelstick and quickly discovered that the BOM in the manual only lists the non SMT parts already soldered to one of your kits. Would it be possible to get a complete BOM for those of us that would like to do a complete scratch build?
Thanks!
Here’s a mouser project with the complete BOM – http://www.mouser.com/ProjectManager/ProjectDetail.aspx?AccessID=9ee5bfce42
Awesome! Thanks 🙂
Question, are all t get components thru hole so we solder or is there smd that’s pretty soldered?
The kits have all the SMD parts pre-soldered and all the thru hole parts are provided for you to solder. I’m currently updating the board and expect to have the new design available spring time.
I decided I’m going to make my own using the OSH Park PCB, but I was wondering, for L1 on the PCB, your Mouser parts list uses a 220 Ohm Ferrite Bead. I already have 4 Ohm Ferrite Beads, will that work in replace of the 220 Ohm Ferrite Bead?
Correction: It’s 40 Ohm, not 4 Ohm.
Part #: ACB2012M-040
Datasheet: http://media.digikey.com/pdf/Data%20Sheets/TDK%20PDFs/ACB%20Series.pdf
Can that be used?
Curious as to the range this unit has. If I were to install these in arches and place them up and down my street. Say 100yrds. Will this need an extender on the antenna? I’d say the typical wifi (Linksys, netgear, cisco etc) is about 200 feet line of sight.
Tnx
Alan
I would recommend an outdoor directional access point, like the Ubiquiti Nanostation locoM2.
I’m pretty new to Arduino and only get this error message:
“””
ESPixelStick:77: error: ‘loadConfig’ was not declared in this scope
loadConfig();
^
ESPixelStick:80: error: ‘initWifi’ was not declared in this scope
int status = initWifi();
^
ESPixelStick:96: error: ‘initWeb’ was not declared in this scope
initWeb();
^
exit status 1
‘loadConfig’ was not declared in this scope
“””
I am running the latest Arduino and the latest ESP8266 Board version and on both windows and arch linux I get the same errors.
Thank you for your great work!!!
Using the Arduino 1.6.5_r5 IDE on Windows solved this problem for me.
If I use the 1.6.7 IDE I get the error above.
The newer version requires forward declarations of the functions. It’ll be fixed in the next push, sorry about the late response! Been away for a bit.
First of all, a big thank you!
I have tested your project with a NodeMCU so far and used up to 64 Pixels and plan to make a wish tree (500+ pixels) with it.
Sometimes I see a bit of a stuttering, have you experienced similar things, or do you know how to improve the rate of frames per second?
Is it the webinterface?
If yes, would an additional button to trigger the webinterface be the solution?
I will try to debug things with Wireshark and I’m already using a dedicated 2,4Ghz n router.
Hello, currently using NodeMCU 0.9. Uploading via Arduino IDE 1.6.5.
Compile Errors as Follows;
ESPixelStick\bitbang.c.o: In function `doGECE’:
C:\Program Files (x86)\Arduino\libraries\ESPixelStick/bitbang.c:58: multiple definition of `doGECE’
bitbang.c.o:C:\Users\spod\AppData\Local\Temp\build3390892978680968553.tmp/bitbang.c:58: first defined here
ESPixelStick\ESPixelDriver.cpp.o: In function `ESPixelDriver::setPin(unsigned char)’:
C:\Program Files (x86)\Arduino\libraries\ESPixelStick/ESPixelDriver.cpp:57: multiple definition of `ESPixelDriver::setPin(unsigned char)’
ESPixelDriver.cpp.o:C:\Users\spod\AppData\Local\Temp\build3390892978680968553.tmp/ESPixelDriver.cpp:57: first defined here
ESPixelStick\ESPixelDriver.cpp.o: In function `ESPixelDriver::begin(pixel_t)’:
C:\Program Files (x86)\Arduino\libraries\ESPixelStick/ESPixelDriver.cpp:60: multiple definition of `ESPixelDriver::setGamma(float)’
ESPixelDriver.cpp.o:C:\Users\spod\AppData\Local\Temp\build3390892978680968553.tmp/ESPixelDriver.cpp:60: first defined here
ESPixelStick\ESPixelDriver.cpp.o: In function `ESPixelDriver::ws2811_init()’:
C:\Program Files (x86)\Arduino\libraries\ESPixelStick/ESPixelDriver.cpp:70: multiple definition of `ESPixelDriver::ws2811_init()’
ESPixelDriver.cpp.o:C:\Users\spod\AppData\Local\Temp\build3390892978680968553.tmp/ESPixelDriver.cpp:70: first defined here
ESPixelStick\ESPixelDriver.cpp.o: In function `ESPixelDriver::show()’:
C:\Program Files (x86)\Arduino\libraries\ESPixelStick/ESPixelDriver.cpp:76: multiple definition of `ESPixelDriver::gece_init()’
ESPixelDriver.cpp.o:C:\Users\spod\AppData\Local\Temp\build3390892978680968553.tmp/ESPixelDriver.cpp:76: first defined here
ESPixelStick\ESPixelDriver.cpp.o: In function `ESPixelDriver::show()’:
C:\Program Files (x86)\Arduino\libraries\ESPixelStick/ESPixelDriver.cpp:83: multiple definition of `ESPixelDriver::updateLength(unsigned short)’
ESPixelDriver.cpp.o:C:\Users\spod\AppData\Local\Temp\build3390892978680968553.tmp/ESPixelDriver.cpp:83: first defined here
ESPixelStick\ESPixelDriver.cpp.o: In function `ESPixelDriver::updateOrder(color_t)’:
C:\Program Files (x86)\Arduino\libraries\ESPixelStick/ESPixelDriver.cpp:96: multiple definition of `ESPixelDriver::updateOrder(color_t)’
ESPixelDriver.cpp.o:C:\Users\spod\AppData\Local\Temp\build3390892978680968553.tmp/ESPixelDriver.cpp:96: first defined here
ESPixelStick\ESPixelDriver.cpp.o: In function `ESPixelDriver::begin(pixel_t, color_t)’:
C:\Program Files (x86)\Arduino\libraries\ESPixelStick/ESPixelDriver.cpp:37: multiple definition of `ESPixelDriver::begin(pixel_t, color_t)’
ESPixelDriver.cpp.o:C:\Users\spod\AppData\Local\Temp\build3390892978680968553.tmp/ESPixelDriver.cpp:37: first defined here
ESPixelStick\ESPixelDriver.cpp.o: In function `ESPixelDriver::begin()’:
C:\Program Files (x86)\Arduino\libraries\ESPixelStick/ESPixelDriver.cpp:30: multiple definition of `ESPixelDriver::begin()’
ESPixelDriver.cpp.o:C:\Users\spod\AppData\Local\Temp\build3390892978680968553.tmp/ESPixelDriver.cpp:30: first defined here
ESPixelStick\ESPixelDriver.cpp.o: In function `ESPixelDriver::begin(pixel_t)’:
C:\Program Files (x86)\Arduino\libraries\ESPixelStick/ESPixelDriver.cpp:33: multiple definition of `ESPixelDriver::begin(pixel_t)’
ESPixelDriver.cpp.o:C:\Users\spod\AppData\Local\Temp\build3390892978680968553.tmp/ESPixelDriver.cpp:33: first defined here
ESPixelStick\ESPixelDriver.cpp.o: In function `ESPixelDriver::setPixelColor(unsigned short, unsigned char, unsigned char, unsigned char)’:
C:\Program Files (x86)\Arduino\libraries\ESPixelStick/ESPixelDriver.cpp:122: multiple definition of `ESPixelDriver::setPixelColor(unsigned short, unsigned char, unsigned char, unsigned char)’
ESPixelDriver.cpp.o:C:\Users\spod\AppData\Local\Temp\build3390892978680968553.tmp/ESPixelDriver.cpp:122: first defined here
ESPixelStick\ESPixelDriver.cpp.o: In function `ESPixelDriver::show()’:
C:\Program Files (x86)\Arduino\libraries\ESPixelStick/ESPixelDriver.cpp:131: multiple definition of `ESPixelDriver::show()’
ESPixelDriver.cpp.o:C:\Users\spod\AppData\Local\Temp\build3390892978680968553.tmp/ESPixelDriver.cpp:131: first defined here
ESPixelStick\_E131.cpp.o: In function `_GLOBAL__sub_I__ZN4E1316ACN_IDE’:
C:\Program Files (x86)\Arduino\libraries\ESPixelStick/_E131.cpp:31: multiple definition of `E131::E131()’
_E131.cpp.o:C:\Users\spod\AppData\Local\Temp\build3390892978680968553.tmp/_E131.cpp:31: first defined here
ESPixelStick\_E131.cpp.o: In function `_GLOBAL__sub_I__ZN4E1316ACN_IDE’:
C:\Program Files (x86)\Arduino\libraries\ESPixelStick/_E131.cpp:31: multiple definition of `E131::E131()’
_E131.cpp.o:C:\Users\spod\AppData\Local\Temp\build3390892978680968553.tmp/_E131.cpp:31: first defined here
ESPixelStick\_E131.cpp.o: In function `E131::initMulticast(unsigned short)’:
C:\Program Files (x86)\Arduino\libraries\ESPixelStick/_E131.cpp:58: multiple definition of `E131::initMulticast(unsigned short)’
_E131.cpp.o:C:\Users\spod\AppData\Local\Temp\build3390892978680968553.tmp/_E131.cpp:58: first defined here
ESPixelStick\_E131.cpp.o: In function `E131::initWiFi(char const*, char const*)’:
C:\Program Files (x86)\Arduino\libraries\ESPixelStick/_E131.cpp:76: multiple definition of `E131::initWiFi(char const*, char const*)’
_E131.cpp.o:C:\Users\spod\AppData\Local\Temp\build3390892978680968553.tmp/_E131.cpp:76: first defined here
ESPixelStick\_E131.cpp.o: In function `E131::beginMulticast(char const*, char const*, unsigned short)’:
C:\Program Files (x86)\Arduino\libraries\ESPixelStick/_E131.cpp:150: multiple definition of `E131::beginMulticast(char const*, char const*, unsigned short)’
_E131.cpp.o:C:\Users\spod\AppData\Local\Temp\build3390892978680968553.tmp/_E131.cpp:150: first defined here
ESPixelStick\_E131.cpp.o: In function `E131::beginMulticast(char const*, char const*, unsigned short, IPAddress, IPAddress, IPAddress, IPAddress)’:
C:\Program Files (x86)\Arduino\libraries\ESPixelStick/_E131.cpp:163: multiple definition of `E131::beginMulticast(char const*, char const*, unsigned short, IPAddress, IPAddress, IPAddress, IPAddress)’
_E131.cpp.o:C:\Users\spod\AppData\Local\Temp\build3390892978680968553.tmp/_E131.cpp:163: first defined here
ESPixelStick\_E131.cpp.o: In function `E131::dumpError(e131_error_t)’:
C:\Program Files (x86)\Arduino\libraries\ESPixelStick/_E131.cpp:239: multiple definition of `E131::dumpError(e131_error_t)’
_E131.cpp.o:C:\Users\spod\AppData\Local\Temp\build3390892978680968553.tmp/_E131.cpp:239: first defined here
ESPixelStick\_E131.cpp.o: In function `E131::initUnicast()’:
C:\Program Files (x86)\Arduino\libraries\ESPixelStick/_E131.cpp:49: multiple definition of `E131::initUnicast()’
_E131.cpp.o:C:\Users\spod\AppData\Local\Temp\build3390892978680968553.tmp/_E131.cpp:49: first defined here
ESPixelStick\_E131.cpp.o: In function `E131::begin(e131_listen_t, unsigned short)’:
C:\Program Files (x86)\Arduino\libraries\ESPixelStick/_E131.cpp:112: multiple definition of `E131::begin(e131_listen_t, unsigned short)’
_E131.cpp.o:C:\Users\spod\AppData\Local\Temp\build3390892978680968553.tmp/_E131.cpp:112: first defined here
ESPixelStick\_E131.cpp.o: In function `E131::begin(char const*, char const*)’:
C:\Program Files (x86)\Arduino\libraries\ESPixelStick/_E131.cpp:119: multiple definition of `E131::begin(char const*, char const*)’
_E131.cpp.o:C:\Users\spod\AppData\Local\Temp\build3390892978680968553.tmp/_E131.cpp:119: first defined here
ESPixelStick\_E131.cpp.o: In function `E131::begin(char const*, char const*, IPAddress, IPAddress, IPAddress, IPAddress)’:
C:\Program Files (x86)\Arduino\libraries\ESPixelStick/_E131.cpp:132: multiple definition of `E131::begin(char const*, char const*, IPAddress, IPAddress, IPAddress, IPAddress)’
_E131.cpp.o:C:\Users\spod\AppData\Local\Temp\build3390892978680968553.tmp/_E131.cpp:132: first defined here
ESPixelStick\_E131.cpp.o:(.rodata._ZN4E1316ACN_IDE+0x0): multiple definition of `E131::ACN_ID’
_E131.cpp.o:(.rodata._ZN4E1316ACN_IDE+0x0): first defined here
collect2.exe: error: ld returned 1 exit status
Error compiling.
Had compile errors before and downgraded to IDE 1.6.5, not sure why I am getting these errors now as others seems to get on ok with using the nodeMCU. Any help would be greatly appreciated.
Hey Jann – not sure if you still check this website but how did you get the pixels working with the firmware on NodeMCU? I am having a hard time with that. I can only get the pixels to be red. I am using GPIO2 / TXD1 for the data stream and 3v3/ground for the power/ground. Is that wrong? Did you have to change the code at all to make it work with the NodeMCU vs the ESPixelStick hardware?
I’m trying to adopt your code for a single LED, but I’m having some issues. I can show that I’m connected to sACN network, but I don’t seem to be receiving any information. Any ideas on how to troubleshoot this? I would really appreciate the help. I’m using an ETC GIO connected to a router to send the information.
I’ve had a few reports of issues using ETC gear as a source, but unfortunately I don’t have any to test with. There’s an issue logged in the github repo talking about this and I plan on looking into the way I’m handling the E1.31 packets soon.
How is the new version coming along? When should we expect the new buy to be available?
I’ve been away lately and just getting back around to working on my projects. I’d expect more mid summer this year.
Hi can you contact me when you have some more kits please.
Thanks
Kevin
Love the look of your device!
I’m thinking of making 20 or so. Is there any chance you would release the gerbers (a bit of a cheeky request i know) or a Panelize version? I’d love to be able to made the boards over at dirty pcbs. getting 8x made in a 10x10cm panel would be a very cost effective of making a batch of boards. Otherwise you could upload your design there and get a kickback on each board purchased.
Thanks, looking forward to seeing the new version
🙂
Any update on when kits will be available in 2016?
I’ve been away lately and just getting back around to working on my projects. I’d expect more mid summer this year.
Hows the new version coming along? Want to purchase quite a few..
Branden, guess I’m waiting for the same update as you. How about it Shelby, are we ready for the new release and buy. I’m in need of about 10 of these, building 5 arches to run around Cul-de-sac and will put these inside the 1 1/2″ HDPE pipe with ws2811 strips, along with a 110AC to 5vDC adapter approx same size. 🙂 The rest will run my 10W Floods via 12vac-12vdc adapters. Patiently waiting. 😉
Shelby,
Any updates?
Looks like an interesting option. Wish there were a way to order a few.
I’ve been away lately and just getting back around to working on my projects. I’d expect more mid summer this year.
Shelby
What changes are you making for the new version?
I’d like to be put on an email list for when the next batch comes out please:)
Do you still sell Espixelstick boards? Please contact me
I see that you have a shared board design on OSHPARK. Is that the final version?
If so, would it be possible to get the SMD parts list, please?
Thanks!
The full Mouser BOM is located here – http://www.mouser.com/ProjectManager/ProjectDetail.aspx?AccessID=9ee5bfce42
Is there a way I can get a complete BOM for these I have the boards ordered from OshPark and the ESP01’s as well as the USB cable to program from Amazon.
The full Mouser BOM is located here – http://www.mouser.com/ProjectManager/ProjectDetail.aspx?AccessID=9ee5bfce42
When are the ESpixelStick coming back?
I have the new prototypes in hand and am in the middle of building and testing them. No solid timeline yet, but it looking like mid to late July.
Thanks Shelby. Looking forward to get some.
How do I get the ESPixelStick???
As of right now, I’m all out of the ESPixelStick kits. I’m in the middle of building and testing the new revision prototypes, which should hopefully be available mid to late July.
just curious are you going to post the schematic so we can see how V2 has changed from V1.3 last year. I’m trying to figure out if its worth replacing my existing boards with the new ones. Then again I had no issues last year so I’m really curious about the changes.
sorry veriosn from last year was 1.1, 1.3 was the firmware.
I’ll post them once the boards are available. The V2 hardware replaces the primary regulator with a switching regulator and no longer requires manual voltage selection for 12V vs 5V power. It also fixes the bug with using 3.3v programmers and has a mounting hole so that it can be attached to a stud in a CG case. The physical size is the same and both utilize the same ESP-01 module.
Shelby, I was running a few tests via xLights on the new test page. All seems to be working ok with the ESPixelStick. When I went to all on, the strip started flashing full white. Looking at the stick I saw the 8266 blicking blue and red light. Like it was locked up. The only way to stop it was pull the power. This also happened on the sequence page when I went to all white. I’ll do a bit more analysis and let you know if there is one specific reason for the board locking up.
Is there any way you will add ArtNet as Input instead of sACN, as many Lighting Gear sends ArtNet and not sACN.
They should be very similar both, but unfortunately I don’t have the skills to adopt it.
There was a pull request submitted with support for it, but we decided not to at the time. I’ll look at adding it again once the 2.0 firmware is complete.
Shelby
How is it coming along? It is early August, and you thought late July, so just asking….
I have small production run in for verification and have been validating them this week. Everything is looking good and the group buys should be starting tomorrow!
where is the group buy? i forget, part of quite a few diy sites.
nevermind, link at top….
Group buy is now open – http://forkineye.com/espixelstick-v2-group-buy/
Shelby, I am curious to know if once the group buy is over if it will still be possible to still purchase the pixelstick as a kit or maybe simply the pre-soldered SMD board?
Great work! lots of people were waiting for this group buy, thanks for putting it together.
I plan on offering the ESPixelStick V2 for sale as a kit after the group buy is complete, however the price will be a little higher than what is available for in the group buy. Thanks!
What is the status here? I want to buy some Kits 🙂
I’ll be starting a group very soon if you’re still interested. Thanks!
I was wondering if there was any more news on the V2 kits.
I didn’t come across the ESPixelStick until after the Group Buy had closed and was interested in a couple to play with.
Was there anyone in the group buy from the UK to get an idea of postage cost/lead time?
thanks
Richard
IIRC, shipping to UK was ~$14 for 10 kits. I calculate shipping individually for all international orders. New group buy should start this week.
Hello Shelby, very good project! I want to assembly one to try it, my problem is that I can´t find the buffer you used, can you suggest me some change, I will stay alert for a new board sell. Thanks!
You’re unable to source the M74VHC1GT125DT1G?
http://www.mouser.com/Search/ProductDetail.aspx?R=M74VHC1GT125DT1Gvirtualkey58410000virtualkey863-M74VHC1GT125DT1G
@Shelby Merrick:
I mean, correct me if I am wrong this is board v1.1 https://oshpark.com/shared_projects/csfAroXY
But you later mention a v2 hardware revision, I was wondering if it also was on oshpark..
Thank you 😉
Sorry for the delayed reply. That’s the correct v1.1 board, yes. The V2 hardware board was never shared on OSH Park. I highly recommend sticking to the V1 if you wish to handle assemble them. The switching regulator on the V2 is very difficult even with a reflow station (10 pin .5mm WSON with power pad).
Shelby
Can this be used on analog rgb as well?
Not on it’s own, there’s not enough pins on the ESP8266. You’d need to have it output serial to another device that did the control.
Am I still able to order these?
Thank you!
I’ll be running another buy on them soon. Planning to start by the end of this month.
Great, thanks!
Group buy is now active again, check here for details – http://forkineye.com/espixelstick-v2-group-buy/
How do i keep missing this. well maybe next time.
Is there anyway to get a notification when it’s group buy time?
I added the email you used on this post to notification list. It’s not active yet, but plan on using it when more available so you should get an email then. Thanks!
Great project, thanks for all your effort on this! Until I found your project I had almost given up on using pixels for Christmas lighting due to Ethernet controller costs. I’m kinda cheap and not frightened to get my soldering iron out if it means saving some $$!
I knocked up a separate programming board on stripboard and a few interface boards on perfboard (they’re nowhere near as pretty as yours, but did I say I was cheap?!); the level shifter sits quite nice between four 0.1″ pads with the input leg lifted a little to ease soldering. I did have to solder them in place when I didn’t have my contact lenses in and was wearing reading glasses so I could see up close! My board is small enough to sit under the ESP-01 leaving the antenna clear. So far I have only three ESP-01s but more are on their way! All are working great with Vixen3 running on a Windows10 guest on a VMWare ESXi virtual server, talking on a separate NIC, VLAN and wireless access point. I see very very few out of sequence packets.
That’s great to hear, good luck on your lighting projects! Thanks!
I’m using your firmware but connected using a nodeMCU esp8266 and a logic level converter to up to 5volts.
everything works well on a single controller pushing 480 ws2801s but when i scale this to three units running 480 LEDS i get flicker and the units are resetting themselves
Make sure your E1.31 source isn’t wireless as well.
When Uploading Sketch Data I receive the following compiler message:
Exception in thread “AWT-EventQueue-0” java.lang.NoSuchMethodError: processing.app.Sketch.getBuildPath()Ljava/io/File;
at com.esp8266.mkspiffs.ESP8266FS.getBuildFolderPath(ESP8266FS.java:117)
at com.esp8266.mkspiffs.ESP8266FS.createAndUpload(ESP8266FS.java:263)
at com.esp8266.mkspiffs.ESP8266FS.run(ESP8266FS.java:322)
at java.awt.event.InvocationEvent.dispatch(InvocationEvent.java:311)
at java.awt.EventQueue.dispatchEventImpl(EventQueue.java:756)
at java.awt.EventQueue.access$500(EventQueue.java:97)
at java.awt.EventQueue$3.run(EventQueue.java:709)
at java.awt.EventQueue$3.run(EventQueue.java:703)
at java.security.AccessController.doPrivileged(Native Method)
at java.security.ProtectionDomain$JavaSecurityAccessImpl.doIntersectionPrivilege(ProtectionDomain.java:76)
at java.awt.EventQueue.dispatchEvent(EventQueue.java:726)
at java.awt.EventDispatchThread.pumpOneEventForFilters(EventDispatchThread.java:201)
at java.awt.EventDispatchThread.pumpEventsForFilter(EventDispatchThread.java:116)
at java.awt.EventDispatchThread.pumpEventsForHierarchy(EventDispatchThread.java:105)
at java.awt.EventDispatchThread.pumpEvents(EventDispatchThread.java:101)
at java.awt.EventDispatchThread.pumpEvents(EventDispatchThread.java:93)
at java.awt.EventDispatchThread.run(EventDispatchThread.java:82)
Which could be the reason why the “Page Not Found” 404 error pops up when I access the node. Loving this project so far. Any thoughts?
What version of Java are you on?
I have the most resent Java 64-bit Version 8 Update 121
Is there some finessing required after I download the latest Java Update to my computer? OR do you think I should download a previous update of Java?
No, that should be fine. You sure the SPIFFS upload plugin is installed correctly? – https://github.com/esp8266/arduino-esp8266fs-plugin
I just redid everything and got a few steps further but am still hitting a road block. Now the “file system is full”
[SPIFFS] data : /Users/kevin/Documents/Arduino/ESPixelStick/data
[SPIFFS] size : 128
[SPIFFS] page : 256
[SPIFFS] block : 4096
/www/bootstrap.css.gz
/www/bootstrap.js.gz
/www/index.html.gz
/www/jqColorPicker.js.gz
/www/jquery-3.1.1.js.gz
SPIFFS_write error(-10001): File system is full.
error adding file!
Error for adding content from www!
[SPIFFS] upload : /var/folders/k0/x6x1z2ls4xx800mf6f2_qzh40000gn/T/arduino_build_703869/ESPixelStick.spiffs.bin
[SPIFFS] address: 0xDB000
[SPIFFS] reset : ck
[SPIFFS] port : /dev/cu.usbmodemFA141
[SPIFFS] speed : 115200
warning: espcomm_sync failed
error: espcomm_open failed
error: espcomm_upload_mem failed
SPIFFS Upload failed!
So I’ve managed to get the SPIFFS upload plugin installed correctly. Now when i upload the sketch data I’m receiving “SPIFFS_write error(-10001): File system is full.” Do you know what files are necessary to gzip and upload?
Make sure you follow the instructions here – https://github.com/forkineye/ESPixelStick/tree/master/html
Hello
I have the same problem, the errors are the same.
How did you solve this problem?
@Kevin H
Hello
I have the same problem, the errors are the same.
How did you solve this problem?
Exception in thread “AWT-EventQueue-0” java.lang.NoSuchMethodError: processing.app.Sketch.getBuildPath()Ljava/io/File;
at com.esp8266.mkspiffs.ESP8266FS.getBuildFolderPath(ESP8266FS.java:117)
at com.esp8266.mkspiffs.ESP8266FS.createAndUpload(ESP8266FS.java:263)
at com.esp8266.mkspiffs.ESP8266FS.run(ESP8266FS.java:322)
at java.awt.event.InvocationEvent.dispatch(InvocationEvent.java:311)
at java.awt.EventQueue.dispatchEventImpl(EventQueue.java:756)
at java.awt.EventQueue.access$500(EventQueue.java:97)
at java.awt.EventQueue$3.run(EventQueue.java:709)
at java.awt.EventQueue$3.run(EventQueue.java:703)
at java.security.AccessController.doPrivileged(Native Method)
at java.security.ProtectionDomain$1.doIntersectionPrivilege(ProtectionDomain.java:75)
at java.awt.EventQueue.dispatchEvent(EventQueue.java:726)
at java.awt.EventDispatchThread.pumpOneEventForFilters(EventDispatchThread.java:201)
at java.awt.EventDispatchThread.pumpEventsForFilter(EventDispatchThread.java:116)
at java.awt.EventDispatchThread.pumpEventsForHierarchy(EventDispatchThread.java:105)
at java.awt.EventDispatchThread.pumpEvents(EventDispatchThread.java:101)
at java.awt.EventDispatchThread.pumpEvents(EventDispatchThread.java:93)
at java.awt.EventDispatchThread.run(EventDispatchThread.java:82)
Are you doing another group buy? or will you publish the PCB files so we can get these made?
I’m planning to make more available either later this month or June. Just too busy right now. Thanks!
I just discovered the ESP8266 a couple of months ago. ( I know I’m always the last to pickup on any new trend )
I immediately started thinking about using this as part of my Christmas display. Knowing how things work on the internet I suspected someone had already beaten me to it. Sure enough I GOOGLED WS8211 and ESP8266 and found this project. Very interesting!
I would be interested in getting in on the group buy as well.
Thanks! I’m in the process of making a full assembled version available via Amazon. Should be available in the next couple of weeks.
Also looking for some!
Hey would love to order 6 of these!
I’d love to put order 50-100 if this is happening any time soon
I’m in the process of making a full assembled version available via Amazon. Should be available in the next couple of weeks.
Just came across this and love it! Interested in tbuying the fully assembled version via Amazon. Keep us posted 🙂 tyty
I have fully assembled ESPixelStick V2’s en-route to Amazon and they should be available by the end of this week – http://amzn.to/2t0cmzv
Keen on purchasing a bunch of these, will they only be available from Amazon? If so what the ETA please?
Many Thanks
Darren
I have fully assembled ESPixelStick V2’s en-route to Amazon and they should be available by the end of this week – http://amzn.to/2t0cmzv
Hi Shelby! Excellent project. In Argentina I can not get M74VHC1GT125DT1G. I can replace it with another buffer.
I await your response.
Regards!
Thanks! Any 5V non-inverting level shifter / buffer should work. I’m not aware of other ones in the same package format however.
Hello, and first of all thank you for this excellent program. I decorated my whole house for the Christmas 2015 with Led ribbon that I ordered thanks to a single module activating the 4 universes. My problem is that I have LED ribbons RGB, BGR and other RBG. Would it be possible to add the possibility in your software to be able to configure several types of led according to their position. For example 1 to 20 RGB and then 21 to 50 BGR then 51 to 70 RGB.
Thanks for your response.
I currently don’t have plans to add such functionality. If you wish though, you can add an “Issue” on the GitHub page and we’ll track it for future inclusion – https://github.com/forkineye/ESPixelStick.
This device has a serial option for DMX/Renard. What exactly does that option do? Does it output a serial stream in Renard protocol that emulates a USB connection? I’m thinking that maybe I could use it to communicate to an Arduino to run some dumb lights.
In Serial mode, you have the option to output DMX or Renard. It will be 5V TTL data coming out of the Data line on the connector. You should be able to feed this right into the UART on your Arduino.
Works well for driving my Arduino MEGA light controller with a Renard protocol sketch. Thanks.
Hi,
I have this issue :
I have made a wifi network and I have connected 4 esp8266 (espixelstick) to it
also I have connected a PC (windows 10) to the network wich runs MADRIX
the esp8266 are programmed to listen multicast.
in the router I have reserved IPs based on esp8266 MAC address
each esp8266 has his own reserved IP
each esp8266 controlls 96 ws2812b leds wich receive the same data ( the inputs are tied together), so all the leds shows the same color and intensity.
the first esp8266 is programmed to listen to the universe 1 / ch 1-3, the second esp : universe 1 / ch 4-6, the third esp : universe 1 / ch 7-9 and so on. Each ESP8266 controlls one RGB pixel.
the pc is connected to the router by wire.
I have powered the esp8266, in a few seconds they connect to the network
I start MADRIX and the ESPs are working corectly
Now, if I restart the power for the esp8266 and MADRIX send data to the netowrk, the esp8266 needs about 5 minutes or more to join the network again.
pls advise what can I do to make the ESPs to join faster to the netowrk.
thanks
That’s really odd. Can you confirm its taking 5 minutes for them to re-connect by watching the serial output when this happens? I’m curious if this is related to some IGMP bugs I just fixed as well. Please download and try 3.0-rc3 and report back. Also, please file an issue on the GitHub page if the problem still exists – https://github.com/forkineye/ESPixelStick.
thanks,
-shelby
Hi Shelby,
sorry for the big delay.
I have done what you said and the time to reconnect to the network is about 10 to 15 sec wich is ok. This is with the PC connected via WIFI to the router.
the time is less then 5 sec if I do not use IP mac reservation in the router.
NOW,
as I talked to you, I want to produce and sale the ESPixelStick in Europe (you said there will be no problem for you).
I have not change the firmware, I am very confident about your work.
What I want to do is : preprogram the espixelstick with the latest firmware and sale it without any posibility to load firmware via serial port. Any new firmware you will post will be uploaded via wifi.
As I saw, if the esp find the network it will join to it; if it does not find it, after about 30 sec it will become AP and it can be accessed via 192.168.4.1 address after you join the pc to it’s network and after that it can be set up the SSID and Password the client wants.
This way we can sale to clients who does not wants to buy or use USB to serial modules and the classic procedure.
So, pls advise if it is ok what I want to do.
thanks,
-Laurentiu
Hi, I am looking to control a 595 chain from the output of the ESP8266 using SPI.
Do you think it could be easy to modify your program to receive E1.31 DMX and convert it in a serial output to feed the 595 chain instead to output DMX or Renard?
I am asking this because I already have a 96 channel RGB controller that uses a chain of 595 shift registers.
Can you give me some hints how to modify your program to add a SPI output?
Thank you!
I started working on WS2801 support which utilizes the HSPI peripheral, however it has not been fully implemented / optimized yet. You can find it in the ws2801 feature branch. Should get you off and running. Note you’ll need a module that breaks out the HSPI pins – https://github.com/forkineye/ESPixelStick/tree/feature-ws2801.
I am giving a try with what you suggested.
I changed the #define for the serial and when I compile the program in Arduino IDE I get “ESPixelStick.ino:47:23: fatal error: E131Async.h: No such file or directory”
I don’t find the library E131Async anywhere, is it an old one not avaiable now?
Thank you!
Link is in the README. I seperated E131Async into its own project – https://github.com/forkineye/ESPAsyncE131
Ah yes, i dowloaded that library too as described in the README.
My problem is that in the program the #include ask for a E131Async and the one in readme is called ESPAsyncE131.
Do I need to change the #include with that name instead of simply E131Async? Is it the same library?
Sorry if this is a silly question for you, I am not that good in programming.
Thank you for helping me and for your work!
Sounds like you may need to update your ESPixelStick git pull. That reference is from when I had async support in my regular E131 library.
Mmm, I think I don’ understand it. I downloaded the https://github.com/forkineye/ESPixelStick/tree/feature-ws2801 and tried to compile but receive the E131Async.h missing.
Looked for the https://github.com/forkineye/ESPAsyncE131 downloaded but not the needed library for the feature-ws2810 sketch.
Then, as you suggested I downloaded the latest Espixelstick. Now my question is:
If i compile the ESPixelstick do I have the pwm out on HSPI pins? I just see Renard and DMX option to select.
Sorry I was meaning in the last part:
“If i compile the ESPixelstick do I have the serial out to feed the 595 on HSPI pins? I just see Renard and DMX option to select.”
Ahhh… It didn’t click that you were on the other branch. I need to sync that up with the master as libraries have changed since I created it.
Thank you! I will wait then!
Any luck with this im getting the same error
Are you on the master branch?
Did you use Eagle for the PCB design? If so, what library contained the mini ATC fuse holder?
Sorry, I didn’t. I use KiCad and model components as needed.
I cant get mine to go into programming mode. Any ideas?
What happens in the serial monitor when you try to program it?
How configure multi- universe in unicast mode?
Should i edit code or changing web option ?
1st universe’s colour sequence is RGB
2nd ……. GBR
3rd …………BRG
How to set all them to RGB?
It sounds like your universe boundary is mis-configured. It’s set by 512 by default, but you can change it via the web front-end. It must match what your sequencer is using, usually 510 or 512.
I tested with
3.0rc3
3.0dev1
3.0rc1
3.0rc2
2.0
Things that where i stuck.
1st…….
How to make universe selection
Ex:- 1st espixelstick 1 to 4 universe
2nd espixelstick 5 to 8
With 510 output range each universe.
2nd
When i put whole setup on test mode
Pixel of next universe(171 number led) is flicking
Have you test multipal universes with 720 pixel ?
If yes > then which firmware you used?
& If no > which firmware you prefer to use for batter performance in multiple universe ?
I recommend 3.0-rc3, until 3.0 final is released. For each stick, you just tell it the starting universe, and how many pixels you want to listen for. If listening for 720 pixels starting at universe 1 while configured with a universe boundary of 510 channels, it will listen for universes 1-5. My test matrix is actually 720 pixels – https://www.youtube.com/watch?v=perR5NHttQ4
Did you have firmware of 2.1dev version?
No, all development is on 3.0+
I downloaded the current zip version How do I install it on the pixelstick
You can find the assembly and usage manual here – http://forkineye.com/wp-content/uploads/2016/09/ESPixelStick-V2-Assembly-and-Usage.pdf
You still doing these kits? I would be interested in playing with a couple of these.
They’re available via Amazon, but are almost sold out. I should have more in stock in a few weeks. Can get them here – http://amzn.to/2xIPi5I.
can’t seem to get this programmed using the flash tool.
Keep getting the following:
-= Building SPIFFS Image =-
bin/win/mkspiffs.exe -c spiffs/ -p 256 -b 4096 -s 131072 firmware/spiffs.bin
/config.json
/www/admin.html.gz
/www/config_net.html.gz
/www/config_pixel.html.gz
/www/config_serial.html.gz
/www/pixel.html.gz
/www/script.js.gz
/www/serial.html.gz
/www/status_e131.html.gz
/www/status_net.html.gz
/www/style.css.gz
-= Programming ESP8266 =-
bin/win/esptool.exe -cd none -cb 115200 -cp COM4 -ca 0x000000 -cf firmware/pixel-2.0-1m_128k.bin -ca 0xDB000 -cf firmware/spiffs.bin
warning: espcomm_sync failed
error: espcomm_open failed
error: espcomm_upload_mem failed
*** PROGRAMMING FAILED ***
How do I verify it is in programming mode?
When I attempt to place it in programming mode before connecting the serial-USB adapter a small blue led lights up on the ESP module.
When I connect the serial-USB adapter, the blue led goes out. I hit upload and there are about 10 flashes of the small blue LED then I get the error shown above.
Any help would be appreciated.
Connect your serial dongle before entering programming mode. The flashes you’re seeing is the serial dongle trying to talk to the ESP module, however the ESP module isn’t it in programming mode. This video a user made may help – https://vimeo.com/231298062
Shelby, thanks for your assistance. Ron Howard’s video helped quite a bit. Finally got it programmed. Main issue was I had connected TX to R and RX to T. Very nice product.
Hey Shelby any closer to allowing it to store some basic sequences to use for indoor trees? Just the ability to read and play basic .fseq files?
I’ll chip in if it helps to get you motivated 🙂
Sorry, I still haven’t had time to get around to it 🙁
Is it possible to change the gpio data pin? I am trying to use a wemos D1 mini and the onboard led in on gpio2. When the led flashes with wifi traffic I get strange behavior on the string of lights.
I changed DATA_PIN in ESPixelStick.h to 5 instead of 2 and recompiled, but it didn’t seem to change anything. I am not sure if I am missing a compile/upload step or if DATA_PIN isn’t really meant to be changed.
Thanks for the help,
Ryan
Sorry, it’s not possible. I do some tricks in the UART to generate the WS2811 signal which requires the UART TX line to be used for driving the pixels.
Thanks for the reply. I have made some progress. I added a wifi led disable to ESPixelStick.
// Initial pin states
pinMode(DATA_PIN, OUTPUT);
digitalWrite(DATA_PIN, LOW);
wifi_status_led_uninstall();
Any Chance these are going back into the Amazon Store this season?
They’ll be back in stock towards the end of this coming week.
Really interested (of course for next year!) but would like to buy a couple when available to get over programming hump.
Amazon still shows no stock. If you get a spare minute, any update on future availability?
Thank you very much in advance.
Brad Engel
DIYC: aggiewonder
I have more stock arriving at Amazon today, but could be a few days before they show up since it’s the busy season. Thanks!
Thank you Sir!
I have a buddy looking for 50 units asap.
Should i refer him to you?
The last of my stock for this year is currently on Amazon. I won’t have anymore until around February 2018 after those sell out.
Do you plan on doing any more group buys or are you just sticking to Amazon distribution in the future? If so, I’d definitely like to get in on the next one and cut out Amazon as the middle-man.
I’m planning a buy right now. Should have more info in a couple of weeks on it. Thanks!
Hi, you have a simple sender for E1.31 ?
I generate my sequences with Vixen 3 and xLights. All data is then sent out as E1.31 via FPP (Falcon Pi Player).
I am new to this scene and was curious if you have even worked with an AlphaPix controller. Is there a way that I can use your ESPixelStick with the AlphaPix to achieve a wireless connection? I need to find a way NOT to drill through my exterior to run a darn Cat5 cable. I mean, it is 2017 and all. Any help or advice would be very much appreciated. Thanks!
Sorry, but I’m not familiar with the AlphaPix configuration. The ESPixelStick is designed to be its own pixel controller, directly driving your pixels via WiFi.
Chris,
You don’t need to do any drilling at all.
Not sure how your displayed is layed out. Are you using a Raspberry PI and FPP to run show. If so, you run CAT 5 to AlphaPix from Raspberry PI and then if Raspberry PI 3, use the Wifi to control ESPixelStick.
I ran my show from the Raspberry PI 2 and FPP being outside in a waterproof enclosure in same setup and control it via Wifi adapter inside house on same home network.
Suggest go over to here http://falconchristmas.com/forum/index.php?board=8.0 or over to doityourselfchristmas.com to get more advanced help.
when are you going to produce more of these-You have me excited to build Christmas with pixels.
Thanks
I should have more around February. Thanks!
Hi Shelby,
I have produce for Christmas holliday a small artificial tree (360mm high) wich has 20 pixels x 16 strings.
I have connected one espixelstick to 160 pixels controlled by Vixen trough wifi connection
I wonder if I can drive all the 320 pixels using only one espixelstick.
Pls let me know how can I configure the espixelstick for this.
Also, a few months ago I asked for the permition to sale in Europe the espixelstick I have produced with your firmware in it.
pls let me know what you decide.
thanks,
BR
Shelby,
I purchased the ESpixelStick from amazon. Set up and testing went perfectly as described in the manual. I could access the web the device via the IP address. I can control and communicate via the IP address perfectly. When remove power I can no longer communicate with the unit. Is there something I missed?
Thanks
Tim
When will you have more for purchase?
When will you have more for sale? Amazon says you have no more and they don’t know when you will have more.
I’m working on getting more in stock now, should show up as available early next week. Thanks!
I cannot find anywhere how many pixels you can drive with this.
680 Pixels.
Please make more!!!
More in stock now, thanks! https://amzn.to/2NBRqFq
They are sold out again. Any word on when you may have more? Looks like an awesome product. Thanks!
I’m a little behind on getting it re-stocked, should be available next week. Thanks!
Hey.
I am also interested in your stick. When will they become available?
Also I am from the UK – Not sure if that helps.
Currently on available via Amazon, sorry – In stock now, thanks! https://amzn.to/2NBRqFq
Any idea when you will have more on Amazon?
In stock now, thanks! https://amzn.to/2NBRqFq
Have any more coming? Thanks!
In stock now, thanks! https://amzn.to/2NBRqFq
looking to purchase one of these to start with. Amazon shows out of stock. thanks for any help
In stock now and I’ll be shipping more next week – https://amzn.to/2NBRqFq
“Just make sure to set the jumper to 5V or 12V based upon your power source. ” I have 12v pixels. Where is the jumper that you speak of? I have a V2.0 2016.05.06
I will be feeding from the 12v power supply through the espixelsstick to the pixels.
Thank you.
The jumper was for the old V1 version. No jumper on the V2, it works from 5v-24v. Just use the voltage your pixels are using.
Wondering if you still do group buys? I purchased 3 from Amazon and truly satisfied with them. No I want more I would like to save a little $$.
Sorry, no plans for a group buy currently. Just don’t have the time to manage one. Thanks!
If I’ll try to use a NodeMCU board to run ESPixelStick firmware, I need to compile the software or can I load the binaries available into https://github.com/forkineye/ESPixelStick/releases ?
The binaries should work. Just need to use the same GPIO pins.
Some feedback about ESPixelStick and NodeMCU board ? I’m interested about that too
I use the NodeMCU boards for prototyping, work great. Juts a little cumbersome to use in the show as you don’t have proper power handling, power filtering, or output buffering.
Amazon is out of stock on these. Do you know when they will be available?
In stock now, thanks! https://amzn.to/2NBRqFq
Amazon is out again 🙁
Are you making some more soon? Thanks.
I’m expecting to have more in stock on Amazon later this week. Thanks!
Shelby, will you be selling more on Amazon?
Sorry, I know its late but I haven’t had time to get kits together lately. I just sent more stock in to Amazon yesterday. They should show as available in the next day or so. Thanks!
I need a few more. Any idea when they will be available?
Sorry, I know its late but I haven’t had time to get kits together lately. I just sent more stock in to Amazon yesterday. They should show as available in the next day or so. Thanks!
Are you planning on putting any more of these up on Amazon again? I bought 1 earlier to test with and now I’d like to get a few more if any are available.
I just sent more stock in to Amazon yesterday. They should show as available in the next day or so. Thanks!
Hi Shelby,
I recently bought a couple of V2 ESPixelSticks from Amazon and plan to drive 12V pixels with it. In the “How Do I Use It > Wiring” section on this webpage, it mentions a 5V/12V jumper. However, my V2 board does not have this jumper. Is the voltage selection automatic on the V2 board?
Thanks,
Tom Hammond
The jumper was for the V1 board. The V2 board is automatic and doesn’t require a jumper. Thanks!
-shelby
Where can I buy these?
Stock should show up this week and you can get them here – https://amzn.to/2qM98Mp. Thanks!
Shelby, when are you planning on making more?
Sorry, I know its late but I haven’t had time to get kits together lately. I just sent more stock in to Amazon yesterday. They should show as available in the next day or so. Thanks!
When will these be back in stock?
Sorry, I know its late but I haven’t had time to get kits together lately. I just sent more stock in to Amazon yesterday. They should show as available in the next day or so. Thanks!
Hey man, is there a reason that 3.0 will not pick up my wifi networks? If I flash them and watch it can’t attach to my wifi networks, it passes and goes to default.. I’ve tried 2 different cards (you sold me 2 replacement esp-xx). It took the flash okay, but can’t seem to get the address. I’ve got 2 of your boards here working fine and a few of the renard. So the flash should be okay. I am using version ESPixelStick_Firmware-3.0 . I don’t have hidden SSID’s so that can’t be it. And again the other 2 which are checks version See below, are working fine. Just wonder what it may be. I grabbed the latest non Travis build but no luck..
Thanks
FW Version
3.0
Build Date
Nov 20 2017
Used Flash Size
1048576
Real Flash Size
1048576
Flash Chip ID
1440e0
How many Universes can it support? How many pixels will it be able to handle?
Recommended maximum is 4 universes or 680 pixels.
Are there any more coming soon
Thanks
Sorry, I know its late but I haven’t had time to get kits together lately. I just sent more stock in to Amazon yesterday. They should show as available in the next day or so. Thanks!
are the pcb files still available? or can I order somewhere? would love to build a few of these
I just sent more stock in to Amazon yesterday. They should show as available in the next day or so. Thanks!
Hi, unfortunately it’s out of stock again, any plans for more? I’d like to try a couple pixel strings for xmas lights this season — I have a GE light string I lost the remote for 🙂
I just sent more stock in to Amazon yesterday. They should show as available in the next day or so. Thanks!
Amazon is out again 🙁
Are you making some more soon? Thanks.
I just sent more stock in to Amazon yesterday. They should show as available in the next day or so. Thanks!
Thank you, I ordered last night. I decided to try to program some of my ESP-01 modules with your firmware and something isn’t working correctly. I use the “ESPSFlashTool.jar” to program the modules and it takes the programming and reboots and connects to my wifi and I am able to go to the web interface, but the moment I make a change and save it tells me it rebooting and never comes back up until I reflash it the module. I have six modules and only one of them takes the programming.
Please help.
You probably bought modules with the PUYA flash chips which don’t work properly with SPIFFS. You won’t have this issue with the modules I include in the ESPixelStick kits. More info on it here – https://github.com/esp8266/Arduino/issues/4061
Just got my 4 pixelsticks and am trying to test. MY problem is that the flash tool isn’t seeing the correct serial port. I ordered the kedsum cp2102 listed on the website and serial program can see that serial port and open it. However, the flashtool only sees my bluetooth ports.
I also tried it on a win10 box and it doesn’t show any ports.
Any suggestions would be greatly appreciated
Sounds like you don’t have the CP2102 drivers installed. You can grab them here – https://www.silabs.com/products/development-tools/software/usb-to-uart-bridge-vcp-drivers
yes, you are correct. I ended up figuring it out. I probably shouldn’t test things in the middle of the nite 😉
Thanks again 🙂
None showing available on Amazon currently, did I miss these already for this year?
I’m trying to get more in stock. Thanks!
The ESPixelStick is awesome. Are they going to become available on Amazon again this year, or do we have to wait till next years holiday session?
I’m trying to get more in stock, thanks!
Any update on when you might get more in stock? Had one for testing that won’t turn on now and looking to get a few more of them for some mobile projects.
All sold out now, will have more available in the spring. What happened to the one you were testing with?
I have had it for over a year and use it to test all my stuff. Flashed it to get it on my new wireless network. Worked great, hooked up to some lights and went out and now no connection and no led on wireless board.
Hoping to buy a few boards, when will they be back in stock on Amazon?
All sold out now, will have more available in the spring. Thanks!
Are more coming to Amazon soon? If not, I can make my own but want to buy from you to say thanks if you’re still making them.
All sold out now, will have more available in the spring. Thanks!
I am interested in 20-25 of these for my 2019 display. May I get a quote
All sold out now, will have more available in the spring. Thanks!
Hey Shelby, I love your work on the Espixelstick firmware, thank you for taking the time to developed it, I would not have a Christmas light show without it.
Do you have plans to do anymore work on this project or is V3 going to be the last official release?
Also what is the difference between the V3 and the travis builds?
Thanks! I do have some plans for future updates, but just haven’t had the time to work on it. 3.0 is the recommended version for now. The Travis builds are automated builds that get generated a new commit is pushed to github. They have not been tested.
Thank you for the replay,
I would be more then happy to be a beta tester for future updates, if ya need one.
Would it be possible for future builds to be based for the ESP32?
Given how robust and reliable the espixelstick firmware is on the ESP8266 (fairly weak hardware by now a day standards with all the new dev boards out), if it were implemented for the ESP32 with twice the power i would think it would be able to do some pretty cool stuff.
Again, thank you for all your hard work.
Are you going to be making any more of these? The one I had just died and I was planning on getting a couple to build some mobile props for my christmas show.
hey can you share the schematic or the layout file?
The schematic is available in the assembly and usage manual.
I congratulate on this project. I’ve tried it with pixel strips and it works perfectly. I would like to make an interface to control my moving heads, smoke machine etc. Is the firmware DMX RENALD?
The firmware supports both DMX and Renard. Just flash the serial version.
Can these be used for servo control?
Sorry, there’s no code to support servo control in ESPixelStick.
Love your firmware and it works just peachy on a NodeMCU.
Your Amazon link now points to kitchen tools, none of which support E1.31.
Thanks for the heads up. I’m working with Amazon to resolve this, but they aren’t being of much help yet. It looks like another seller took over my listing and changed it.
While you’re working to straighten out Amazon, is there another method of purchasing? I have love these devices. I have 5 in my Christmas light show and need a few more..
Sorry, no more boards are slated for production this year. I’m currently working on a V3 board which will be available next year.
Any timeline on Amazon fixing the link? Will these be available to purchase prior to Christmas 2019?
Sorry, no more boards are slated for production this year. I’m currently working on a V3 board which will be available next year.
Will it be possible to still get v2 boards? $50 is a big step up I can’t really afford. Also, will you make a version that will be able to produce pwm from e1.31 data on separate output channels to be able to run ‘dumb’ rgb strips?
The $50 price you see on Amazon is a “FBM” price just to keep the listing under control. When I run out of stock, other people can take over the listing and change it. The price for the V3 boards are $25 via Amazon prime. If you see the price at $50, wait for Prime inventory to show back up and it’ll automatically drop to $25.
Hi! Can this be purchased in Europe? I would love to buy a couple if possible – could you send me directly maybe?
I’m working on getting an eCommerce solution setup outside of Amazon to support international orders.
Any update as to when you will be able to sell in Europe, brought some while ago thru a diyChristmas Bulk buy. But need some more
As of now, they are only available via Amazon. I’m working on setting up a site to support international orders which should be ready the first of 2021.
thanks,
-shelby
I’ve been running V1.4 on ESP-01 modules for forever. I have even made custom PCBs for my lighting system. (These darn things are awesome once they get configured and you don’t accidentally fry them!) After upgrading to V3/V3.1 nothing seems to work anymore. I know the DMX output used to come out of the TX pin on an ESP-01 module in V1.4. So what is the DMX out pin in the V3/V3.1 code now?
Nothing has changed from 1.4 in regards to the output pin in my released binaries. It’s always been GPIO2 (TDX1).
where can we purchase these?
They are available on Amazon – https://amzn.to/2JEujxh
Hi Shelby !
Very nice piece of code you wrote for the pixelstick !
I’M running 10 strips each have a ESP with 50 led on it,all on WIFI. sometime i got lags and short stalls.
i’m curious if your planning to add the sACN Sync feature soon in your code ?
i’m running on lightjams and the software will support sync in is next release, soo i want to check if you got the feature in the new code 🙂
https://www.namm.org/thenammshow/2019/events/sacn-universe-synchronization-explained
thanks
Thanks! The sync feature wouldn’t help in the issue that you are experiencing, it’s something in your setup. Can you describe your network layout? Access point, devices connected to it, and what you’re streaming from? Is your source wired or wireless? You can contact me at support@forkineye.com if you would like.
my setup is this :
Computer running lightjams wired in an Ubiquiti Pro AP (gigabit) streaming to 10 esp8266 on G 2.4ghz. all the devices are on fixed IP’s
I d’ont have a router between my computer and the AP to save a treatment step, that why all devices are on fixed IP’s
Do you have any other devices connected to that AP? Portable devices (phones, tablets, laptops, etc..) trigger a power saving feature in the 802.11 stack that will kill your multicast rates.